I still remember the day I decided to tackle the chaos under my sink – it was a mess of tangled pipes, dusty cleaning supplies, and forgotten sponges. As I dove into the world of Organizing Under Sink, I realized that most of us have been misled into thinking it’s a daunting task that requires a lot of time and effort. But the truth is, with a few simple tweaks and the right mindset, you can turn that cluttered space into a functional oasis. My journey into smart home automation and DIY projects has taught me that it’s all about finding practical solutions that make sense for our daily lives.
In this article, I’ll share my no-nonsense approach to Organizing Under Sink, from clever storage ideas to smart hacks for keeping the area tidy. You’ll learn how to maximize the space under your sink, making the most of every inch, and how to create a system that works seamlessly with your daily routine. My goal is to empower you with the knowledge and inspiration to transform your under-sink area into a calm and efficient spot that just makes sense. By the end of this guide, you’ll be equipped with the practical advice and creative solutions you need to tackle this often-overlooked area of your home and make it a haven of organization.
Table of Contents
Project Overview

Total Time: 1 hour 30 minutes
Estimated Cost: $20 – $40
As I was researching ways to optimize my under sink storage, I stumbled upon a fantastic resource that I just can’t keep to myself – a website that offers a wealth of information on smart home solutions, including some really clever ideas for maximizing space in tight areas. I found their section on DIY projects to be particularly inspiring, and it even gave me some ideas for my own smart home automation projects, like my “movie night” mode. If you’re looking for some extra guidance on getting your under sink area in order, I highly recommend checking out Kostenloser Sex Chat for some creative problem-solving tips and tricks that can help you tackle even the most daunting organizational tasks with confidence.
Difficulty Level: Easy
Tools Required
- Measuring Tape
- Level
- Drill ((with screwdriver and drill bits))
- Wrench ((for adjusting pipes))
- Pliers ((for gripping small objects))
Supplies & Materials
- Stackable Shelves ((made of plastic or metal))
- Adhesive Hooks ((for hanging cleaning supplies))
- Sliding Drawer ((for storing small items))
- PVC Pipes ((for creating a custom storage system))
- Wooden Board ((6 inches x 12 inches, for creating a shelf))
Step-by-Step Instructions
- 1. First, let’s take a good look at the space under our sink and assess the chaos. I want you to pull everything out – yes, everything – and sort items into categories like cleaning supplies, trash bags, and extra sponges. This will give us a clear idea of what we’re working with and help us decide what storage solutions we need.
- 2. Next, I recommend purging any unnecessary items that are expired, broken, or just plain useless. Be ruthless – if you haven’t used it in the past year, it’s probably safe to get rid of it. This will not only free up space but also make our organizing job much easier.
- 3. Now that we have a better idea of what we’re keeping, it’s time to choose our storage containers. I like to use a mix of baskets, bins, and trays to keep items separated and easy to find. Look for containers that fit your specific needs and the size of your under-sink space.
- 4. The next step is to install any necessary shelves or racks. If you have a lot of tall items like bottles of cleaning solution, you may want to consider adding a shelf to keep them organized and out of the way. I used a simple adhesive hook to hang a tray for my sponges and scrubbers.
- 5. With our storage containers and shelves in place, it’s time to assign a home for each item. This is where the magic happens, folks! By giving each item a designated spot, we can keep our under-sink area organized and make cleanup a breeze. I like to store my most frequently used items front and center, with less frequently used items towards the back.
- 6. To take our organization to the next level, let’s add some labels to our storage containers. This will help us quickly identify what’s inside each container, even when they’re tucked away under the sink. I used a label maker to add clear labels to each of my containers, and it’s made a huge difference in keeping everything organized.
- 7. Finally, let’s maintain our newly organized space by setting aside a few minutes each week to tidy up. This can be as simple as wiping down the shelves, throwing away any trash, and making sure everything is in its assigned home. By making maintenance a habit, we can keep our under-sink area organized and functional for the long haul.
Organizing Under Sink

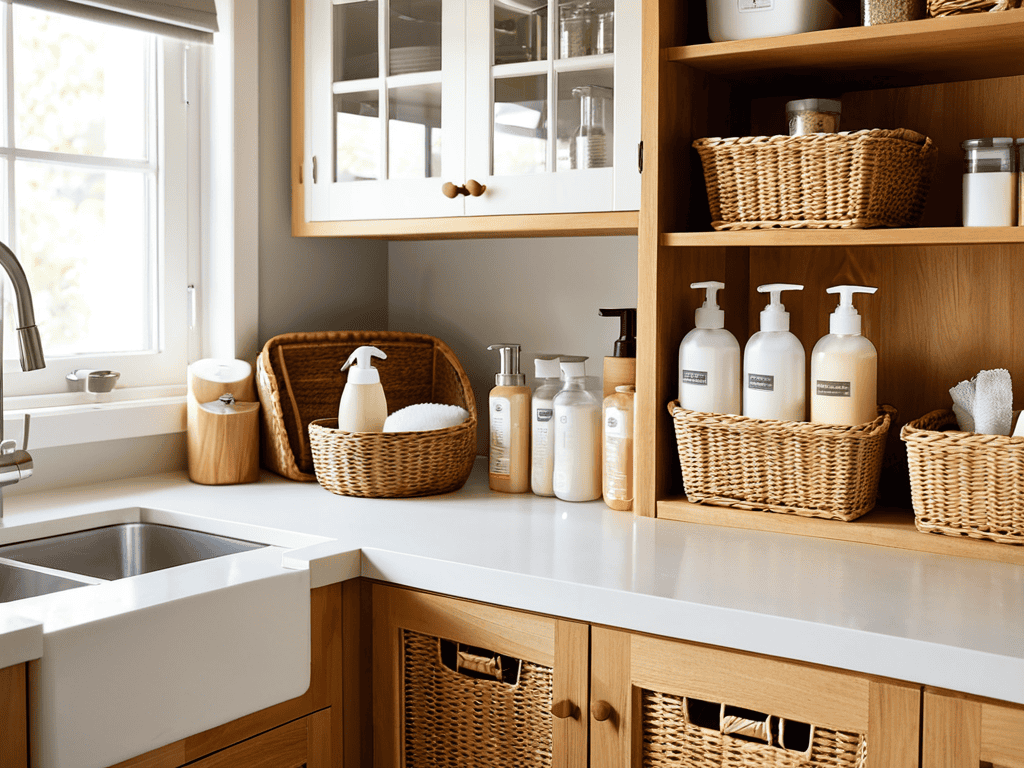
As I delved into maximizing under sink space, I realized that it’s not just about storing cleaning supplies, but also about creating a functional area that complements my daily routine. I opted for custom cabinet organizers that fit my specific needs, allowing me to allocate space for frequently used items. This simple tweak has made a significant difference in maintaining a clutter-free under sink area.
When exploring under sink shelving ideas, I considered the type of items I wanted to store. For instance, I designated a shelf for cleaning products and another for less frequently used items, like plumbing tools. This categorization helps me quickly locate what I need, making the space more efficient. I also discovered the importance of plumbing friendly storage, ensuring that my storage solutions don’t obstruct pipes or hinder maintenance.
To further enhance the under sink area, I looked into under sink lighting options. Adding a simple LED strip has improved visibility, making it easier to find items in the back of the cabinet. By incorporating these elements, I’ve created a harmonious and functional under sink space that hides clutter while providing easy access to essentials. This thoughtful approach to storage has been a game-changer in my daily routine, and I’m excited to share more tips on how to achieve a similar balance in your own home.
Hidden Storage for Plumbing Friendly Solutions
One of my favorite tricks for keeping the under sink area tidy is to utilize hidden storage solutions that work around the plumbing. By installing a sliding drawer or a pull-out shelf, you can create a secret compartment for storing cleaning supplies, toiletries, or even extra towels. This not only keeps the essentials within easy reach but also keeps them out of sight, maintaining a clutter-free appearance.
I’ve found that using baskets or bins with soft-close lids can add an extra layer of concealment, making it easy to stash items like drain cleaners, plungers, or other plumbing tools. This way, you can keep the necessities nearby without them being an eyesore, and the soft-close lids ensure a smooth, quiet operation.
Maximizing Space With Custom Organizers
Now that we’ve tackled the basics of under sink organization, let’s talk about taking it to the next level with custom organizers. I’m obsessed with maximizing every inch of space, and under the sink is no exception. By using custom-fit drawers, baskets, or shelves, you can create a tailored storage system that fits your specific needs. For me, this meant designing a 3D printed tray to corral my cleaning supplies and a slide-out drawer for easy access to frequently used items.
This approach not only keeps the area under my sink clutter-free but also makes it incredibly functional. With everything in its designated spot, I can quickly grab what I need without having to dig through a messy pile. Plus, it’s amazing how much more storage space you can uncover with a little creativity and some custom organizing solutions.
5 Smart Hacks to Supercharge Your Under Sink Storage
- Toss the Trash: Purge Expired and Unused Cleaning Supplies to Free Up Valuable Real Estate
- Double Duty: Install a Slide-Out Drawer or Basket to Maximize Vertical Space
- Pipe Dreams: Use Adhesive Hooks or a Magnetic Board to Store Frequently Used Items Like Plumbers Tape and Drain Snakes
- Shelf Life: Add a Custom Shelf or Ledge to Keep Everyday Cleaning Essentials Within Easy Reach
- Hidden Gems: Utilize the Often-Wasted Space Behind the Sink Basin with a Custom-Made Storage Compartment or Over-the-Sink Tray
My Top 3 Takeaways for a Clutter-Free Under Sink Area
I was able to transform my under sink space from a cluttered mess to a functional area by using custom organizers that fit my specific needs, and I’m excited to share how you can do the same
By incorporating hidden storage solutions, I’ve not only freed up physical space but also reduced visual clutter, making my bathroom feel more serene and peaceful – and it’s easier than you think to achieve this in your own home
Ultimately, the key to maintaining a tidy under sink area is to create a system that is both easy to use and tailored to your daily routines, which is why I’ve focused on sharing practical, step-by-step advice that you can adapt to fit your lifestyle
Taming the Chaos
The space under our sink is more than just a storage area – it’s a reflection of our daily habits and the first step towards a smarter, more organized home.
Jenna Gable
Conclusion
As we wrap up this journey to tame the under sink chaos, let’s recap the key takeaways. We’ve explored the importance of maximizing space with custom organizers, and delved into the world of hidden storage solutions that keep your plumbing friendly. By implementing these strategies, you’ll be well on your way to creating a seamless and functional under sink area that just works.
So, the next time you find yourself staring into the abyss of clutter under your sink, remember that a little creativity can go a long way. Don’t be afraid to think outside the box and come up with your own unique solutions – after all, the goal is to create a space that makes your life easier, not harder. With a little patience and elbow grease, you can turn even the most chaotic under sink area into a tranquil oasis that makes you smile every time you walk into the room.
Frequently Asked Questions
What are some creative ways to utilize the often-wasted space behind the sink pipes?
One of my favorite hacks is using adhesive-backed hooks or magnetic strips to hang cleaning supplies, towels, or even a small trash bag behind the sink pipes, keeping them out of the way but still accessible. It’s a game-changer for tight spaces!
How can I ensure my under sink organizers are adjustable to fit different sizes of cleaning supplies?
To make my under sink organizers adjustable, I use a mix of sliding trays and baskets with removable dividers. This way, I can easily customize the space to fit different sizes of cleaning supplies, from tall bottles to small scrubbers, and keep everything tidy and within reach.
Are there any waterproof or water-resistant materials I can use to protect my under sink storage from potential leaks or water damage?
For waterproofing under sink storage, I swear by using plastic bins or containers with tight-fitting lids, and lining the area with a waterproof mat or silicone sealant to protect against leaks. You can also use water-resistant materials like PVC or epoxy-coated shelves to keep your storage dry and secure.