


I still remember the first time I tried soldering – I was a teenager, eager to void that warranty and upgrade my old gaming console. I ended up with a burnt circuit board and a lot of frustration. But that’s when I learned the importance of having the right tools, especially when it comes to the best soldering irons for beginners. The problem is, most guides out there will tell you to just “get a good one” without explaining what that even means. Let me tell you, it’s not just about slapping some solder on a board and hoping for the best.
So, what makes a soldering iron truly beginner-friendly? In this article, I’ll give you the lowdown on what to look for in a soldering iron, and share my top picks for best soldering irons for beginners. I’ll also walk you through some common mistakes to avoid, and provide some practical tips for getting started with soldering. My goal is to empower you to take control of your own tech, and to show you that with the right tools and a bit of practice, you can achieve professional-grade results without breaking the bank.
Table of Contents
Guide Overview: What You'll Need

Total Time: 1 hour 15 minutes
Estimated Cost: $20 – $100
Difficulty Level: Easy
Tools Required
- Soldering Iron Choose a beginner-friendly model with adjustable temperature control
- Soldering Iron Stand For safe and stable storage
- Wire Stripper For stripping insulation from electrical wires
- Pliers Needle-nose pliers for gripping small components
- Soldering Iron Tip Cleaner For cleaning the soldering iron tip
Supplies & Materials
- 60/40 Solder A good all-purpose solder for beginners
- Flux For promoting smooth solder flow
- Electrical Wire For practice soldering
- Breadboard For building and testing circuits
- Solder Wick For removing excess solder
Step-by-Step Instructions
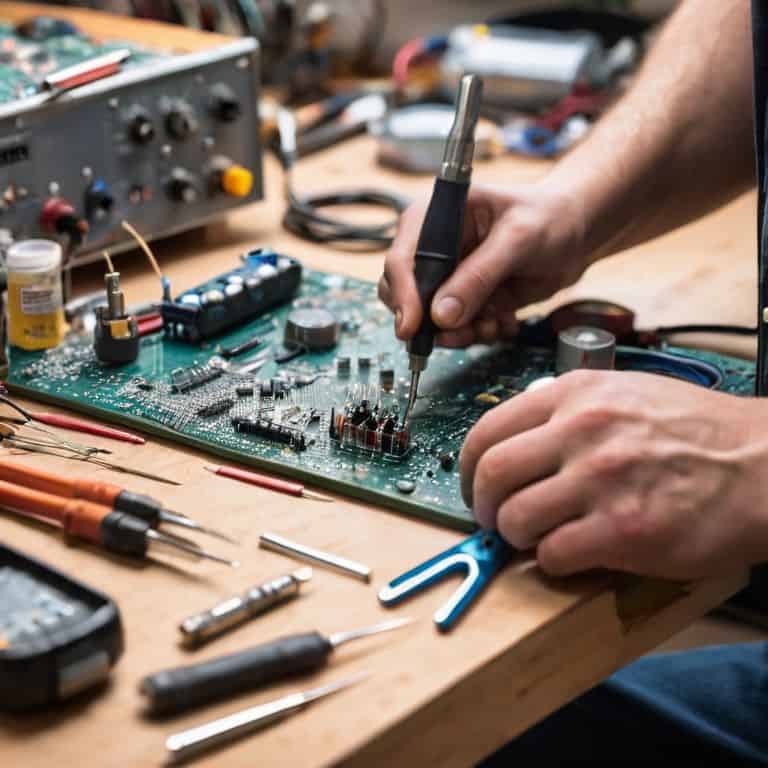
- 1. First, let’s talk about the essential features you should look for in a soldering iron as a beginner. You want an iron that’s easy to handle, has a comfortable grip, and a precise tip for those tiny components. I always recommend checking the iron’s wattage and temperature control – you want something that can handle a variety of tasks, from delicate circuit boards to thicker wires.
- 2. Next, you’ll need to choose the right type of soldering iron for your needs. You’ve got two main options: a temperature-controlled iron or a basic fixed-temperature iron. As a beginner, I’d recommend starting with a temperature-controlled iron – it gives you more flexibility and helps you avoid damaging components. Plus, it’s a great way to learn about the different temperatures required for various types of solder.
- 3. Now that you’ve got your iron, it’s time to think about safety precautions. Soldering can be a bit hazardous, so make sure you’ve got a heat-resistant surface to work on, and a fire extinguisher nearby (just in case). You should also invest in a good pair of heat-resistant gloves and some safety glasses to protect yourself from splashes and spills.
- 4. With your safety gear in place, it’s time to assemble your soldering station. This includes your iron, a soldering iron stand, and a solder reel. I like to keep my station organized with a tool tray or a small parts container to keep all my bits and bobs within easy reach. Don’t forget to grab a soldering iron tip cleaner – it’s a lifesaver when it comes to keeping your iron in good condition.
- 5. Once you’ve got your station set up, it’s time to choose the right solder. You’ve got a few options here, but as a beginner, I’d recommend starting with a 60/40 tin-lead solder. It’s easy to work with and has a relatively low melting point, making it perfect for most beginner projects. Just be sure to check the diameter of the solder – you want something that’s easy to handle and won’t leave too much excess solder on your components.
- 6. Now it’s time to practice your soldering technique. Start with some simple exercises like soldering two wires together or attaching a component to a circuit board. Remember to use the right amount of solder – too little and the joint won’t be strong, too much and you’ll end up with a mess. It’s all about finding that perfect balance.
- 7. As you get more comfortable with your soldering iron, it’s time to move on to more complex projects. Try building a simple circuit or repairing a broken device. Don’t be afraid to experiment and try new things – that’s all part of the learning process. And remember, voiding warranties is just part of the fun – you’re taking control of your technology and making it your own.
Soldering Like a Rebel

Now that we’ve got our hands on the right tools, it’s time to _dive into the world of soldering_. As a beginner, it’s essential to understand the importance of soldering iron temperature settings. A good soldering iron should have adjustable temperature settings to ensure you’re not applying too much heat to your components. This is crucial for preventing damage to your projects and ensuring a strong, reliable bond.
When it comes to choosing the right soldering tip, it’s all about _precision and control_. A good tip should be able to withstand high temperatures and maintain a consistent flow of solder. For small projects, a fine-tip soldering iron is ideal, as it allows for more precise application of solder. Remember to always follow soldering iron safety precautions to avoid any accidents or injuries.
As you start working on your projects, keep in mind that _practice makes perfect_. Don’t be discouraged if your first few attempts at soldering don’t turn out as expected. With time and patience, you’ll develop the skills and confidence to take on more complex projects. Start with beginner friendly soldering projects, such as building a simple circuit or repairing a broken device, and gradually move on to more challenging tasks.
Best Soldering Irons for Beginners
When it comes to choosing the best soldering iron for beginners, I always recommend starting with a temperature-controlled iron. These irons allow you to adjust the heat to suit the specific job, which is crucial for avoiding damage to components. I’ve had my fair share of burnt circuit boards, and trust me, it’s a frustrating mistake to make. Look for an iron with a comfortable grip and a clear temperature display – it makes all the difference when you’re just starting out.
Some of my favorite beginner-friendly soldering irons include the Hakko FX-951 and the Weller SP25NK. Both of these irons offer great temperature control and are relatively affordable. I’ve used them to build and repair everything from custom gaming PCs to retro consoles, and they’ve never let me down.
Soldering Iron Safety First
Now that we’ve got our rebel spirit ignited, let’s talk safety. I know, I know – safety doesn’t exactly scream “rebel,” but trust me, it’s crucial. You don’t want to end up with a nasty burn or, worse, a damaged project. When working with soldering irons, make sure you’ve got a well-ventilated workspace, a heat-resistant surface, and some decent insurance – aka a fire extinguisher nearby.
I’m not trying to be a buzzkill, but safety goggles and a soldering iron stand are also must-haves. Don’t be like me, learning the hard way that a rogue soldering iron can leave a nasty scar. Keep your work area tidy, and never leave your iron unattended. With these simple precautions, you’ll be free to experiment and push the limits of what’s possible with soldering, all while keeping your fingers – and your project – intact.
Soldering Like a Pro: 5 Essential Tips for Beginners
- Choose a soldering iron with an adjustable temperature control to ensure you’re using the right heat for your project
- Select a soldering iron with a comfortable, ergonomic handle to reduce fatigue and improve precision
- Invest in a soldering iron with a high-quality, durable tip that can withstand frequent use and cleaning
- Consider a soldering iron with a built-in stand or holder to keep your workspace organized and prevent accidents
- Don’t be afraid to experiment with different soldering iron brands and models to find the one that feels most comfortable and intuitive for you
Key Takeaways for Soldering Rebels
Soldering iron selection is crucial for beginners, and choosing the right one can make all the difference between a frustrating and an empowering experience
Understanding soldering iron safety is vital to avoid injuries and damage to your projects, so always follow best practices and precautions
By investing in a good soldering iron and mastering the basics, you’ll unlock a world of DIY possibilities, from repairing your own devices to creating custom projects and bringing your tech ideas to life
Soldering Wisdom
The best soldering iron for a beginner isn’t about the price tag or the brand name, it’s about finding the one that makes you feel like a master of the motherboard, not a slave to the manual.
Frankie Miller
Embracing the Art of Soldering
In conclusion, finding the best soldering iron for beginners is all about understanding your needs and choosing the right tool for the job. We’ve covered the essential steps to get started with soldering, from safety precautions to selecting the perfect iron. Remember, soldering like a rebel means being willing to experiment, learn from your mistakes, and push beyond the boundaries of what’s possible. By following the guidelines and recommendations outlined in this article, you’ll be well on your way to becoming a skilled soldering enthusiast, capable of tackling a wide range of projects and repairs.
As you embark on your soldering journey, keep in mind that the true power of DIY technology lies in its ability to unleash your creativity. Don’t be afraid to try new things, void warranties, and modify your devices to suit your needs. With the right mindset and tools, you’ll be able to breathe new life into old gadgets, create innovative projects, and join a community of like-minded makers who are passionate about taking control of their technology. So, go ahead, pick up that soldering iron, and start building a world where technology is truly yours to shape and mold.
Frequently Asked Questions
What are the key features to look for in a beginner-friendly soldering iron?
When shopping for a beginner-friendly soldering iron, look for adjustable temperature control, a comfortable grip, and a durable tip. I also recommend a iron with a clear temperature display and a safety switch to prevent accidents. Trust me, these features will make all the difference in your soldering journey!
How much can I expect to spend on a good soldering iron for beginner projects?
Dollar for dollar, you can expect to spend anywhere from $20 to $50 on a solid beginner-friendly soldering iron. Don’t worry, you don’t need to break the bank – I’ve gotten great results with irons in this price range, and they’ll get you through most small projects and repairs.
What are some common mistakes to avoid when choosing and using a soldering iron for the first time?
Hey, rookie mistake alert! Don’t grab just any soldering iron – make sure it’s got a comfortable grip, adjustable temp, and a decent tip. And for the love of all things tech, don’t touch the element with your bare hands, and keep it away from kids and pets. I’ve got a whole drawer full of spare parts from my own learning curve, trust me, you don’t want that.